
On the one hand, it certainly requires some imagination to visualize the correct line of a breaking putt and to determine how hard to hit it. At the same time, it helps to be familiar with some of the well-established principles and processes the best green readers employ.
There’s no denying, though, that the better you become at reading greens, the better your overall putting will become. As noted putting and short game aficionado Dave Pelz observed after extensive research on the subject, “70% of putts missed under 9 feet are missed more by misreading greens than by your stroke.” And yet, golfers will routinely blame their stroke after a missed putt, unaware that the root cause of the miss may have been a faulty read.
So how can you improve this critical part of your game? That’s the purpose of this article. Sure, having a Scotty Cameron putter helps, but there is no substitute for practice and know-how. Here is how the best putters approach green reading, and how you can apply their techniques to your own process when faced with a breaking putt.
First, here are some of the fundamentals of how a golf ball behaves on greens with any slope. Understanding these guidelines is a prerequisite to making a correct read.
The ABCs of Breaking Putts
Some fundamental principles apply to the path and speed a ball will take to the hole whenever the green has any slope, either left-to-right, right-to-left, front-to-back, or back-to-front. It’s essential to grasp these basic principles, as they form the basis of all the other green reading techniques and allow you to determine where and how much a putt will break and how hard you should roll the putt.
Principle #1
The amount and direction of the slope, along with the pace at which you hit the putt, will significantly impact how much the slope will affect the putt.
For example, a putted ball will be more affected by the slope whenever it travels slowly, and less affected by the slope whenever it travels faster. How does that work in actual practice?
If you’re facing a downhill putt, for which you’ll naturally need to hit the putt with less pace (slower), you should expect that the ball will break more. That is, it will be more affected by the slope due to its slower speed.
Conversely, when facing an uphill putt for which you’ll need to apply more pace (faster), you should anticipate that the slope will have less of an effect on the amount the ball will break. That is, due to the faster speed of the ball, it will tend to break less.
Principle #2
Any putt will be moving faster immediately after impact than it will be on the last several feet of its approach to the hole. Naturally, it must slow down as it nears the hole to allow it to drop in. The lessons learned in Principle #1 apply here as well in understanding how the putt will react.
Because the ball will be moving faster immediately after it’s struck, it will break less in the beginning part of the putt. And when the ball slows down as it nears the hole, it will break more. It’s been said that up to 60% of the break occurs in the last three feet of the putt.
Principle #3
When the slope is left-to-right or right-to-left (a sidehill putt), there will be a tendency for the putt to break more than most amateurs allow. Again, the speed of the putt is the determining factor here. Often, sidehill putts require the putt to be hit with less pace (slower), and that slower speed causes the ball to move more significantly left or right than was initially expected.
This often explains why many high-handicap golfers miss sidehill putts on the “low” side -- sometimes referred to as the “amateur” side -- of the hole. They don’t consider that the slower speed that they need to apply to the putt will cause it to break more, and thus they usually miss these breaking putts below the hole.
Now hopefully, with a better understanding of the relationship between the slope of the putt and the pace it needs to be hit, amateurs will be encouraged to play more break on these sidehill putts, allowing the ball to approach the cup on the “high” side -- often referred to as the “pro” side.
The Secret Sauce: Matching the Speed to the Line
As can be seen in the principles outlined above, there is an inextricable linkage between the line on which you hit your putt and the pace with which you hit it. You can be the greatest green reader in the world, able to identify the perfect line for any putt, but unless those great reads are combined with the correct speed, you’ll usually end up with a miss. A breaking putt that is hit too hard will miss on the high side of the hole while breaking putts with insufficient pace will miss on the low side.
To be a good putter in general, even on straight putts, requires good and consistent speed control. Leaving putts well short of the hole, or blowing them well past the hole, is a recipe for the dreaded 3-putt. But, while good speed control is important on straight putts, it’s crucial on breaking putts.
One of the secrets to green reading, then, is to not only visualize the line but to figure out the needed pace, and then match the two.
Understanding the Importance of the Fall Line
The best green readers understand the importance of identifying the “fall line” on every breaking putt. If that isn’t a part of your pre-putt routine, then your green reading is probably less effective than it should be (along with your ability to sink breaking putts).
What is the fall line? From wherever the hole placement is on the green, there is an imaginary line that defines what would be a perfectly straight uphill or downhill putt to that hole. That connected straight line from above the hole to below the hole, in which there would be no discernable break in the putt, is the fall line. You can also think of the fall line in terms of how water would flow if poured on the green. Water will naturally follow the line closest to straight downhill (i.e., the fall line).
Once you’ve identified where that fall line is, you can then make some assessments as to how your upcoming putt will break...based on its position relative to that fall line. When you watch the Tour pros on TV lining up their putts, and you see them walk to an area well away from their ball and they start taking practice strokes, chances are good that they are visualizing the fall line and figuring out how their ball will behave based on that line.
Let’s use a clock face analogy to help you visualize the concept. Once you’ve identified the fall line for a particular hole placement, imagine that the straight uphill putt to that hole would begin at 6 o’clock (the low point). Conversely, a straight downhill putt from above that hole would start at 12 o’clock (the high point). Putting from either of those points would result in a roll with no break.

However, any ball position to the right or left of that straight fall line will result in a putt that breaks toward the fall line. In other words, a ball that starts at a point on the right side of the clock face, say 2 o’clock, will break from right to left. On the other hand, a ball that starts at a point on the left side of the clock face, say 10 o’clock, will break left to right. In both examples, you can see that the putt will curve in the direction of the fall line.
You still need to be sensitive to the pace that these putts are hit, but you can at least be sure that you’ve read the break of the putt correctly if you’ve first identified the fall line and then assessed your ball’s position in relation to that fall line.
Visualize the Putt in Two Parts
An effective technique in reading breaking putts is to break the putt down into two parts.
- The first part of the ball’s journey to the hole starts at the ball and proceeds to the apex or high point of the line. This apex can be thought of as your aim point.
- The second part of the putt is from the apex of the line to the hole. This is where gravity and the putt's break combine to swing the putt toward the hole.
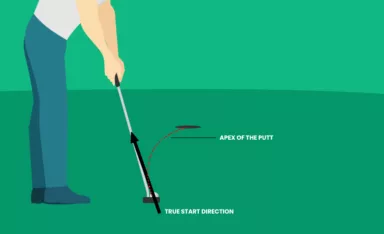
Many great putters think of every putt as straight, even for those with break. They make the apex (aim point) their focus, not the hole, and execute a straight putt from their ball to that apex, allowing gravity and the slope to do the rest.
Looking at breaking putts in this way, while keeping in mind the speed principles we outlined previously (i.e., whenever the second part of the putt is downhill, for example, it will break considerably more than if it were a level putt), will better enable you to see the line and discern its corresponding proper pace.
Finding the “True Center” of the Hole
On any breaking putt, the ball enters the hole at some point on the side of the cup. A right-to-left putt will enter the hole on the right side of the cup, and, conversely, a left-to-right putt will enter on the left side of the cup. Exactly where on the side of the cup each breaking putt enters, determined by the amount of break, is considered the “true center” of the hole.
An often-overlooked skill in green reading is identifying that true center, first by
determining the exact part of the hole where the ball will enter and, second, calculating where you need to start the putt so that it will take the break and curve into the hole over that exact entry point.
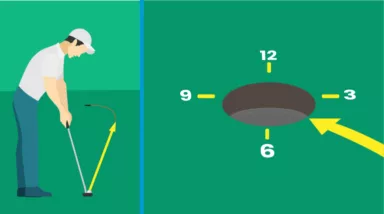
An effective way to do this is by, once again, visualizing the hole itself as the face of a clock. A straight putt would enter the hole at 6 o’clock. A right-to-left breaking putt may enter the hole at 5 o’clock or 4 o’clock. Left-to-right putts may enter at 7 o’clock or 8 o’clock. The trick is to see and feel how much the putt will break overall, paying particular attention to its last few feet, and determining that exact clockface entry point. That entry point becomes the true center of the hole for that putt.
Amateurs frequently make the mistake of always seeing “6’ o’clock” as the center of the hole, even on breaking putts.
Green reading is a skill that requires you to be both an artist and a scientist. The artist must use visualization and feel to see the line and to simultaneously imagine how much pace is required. The scientist must understand and apply the importance of speed control in determining break and factor in concepts such as the “fall line“ and determining the hole’s “true center” to become a more effective green reader and, therefore, a more effective putter.